A Whirlpool refrigerator keeps your food fresh and your kitchen running smoothly, but its air filter is often forgotten until odors start creeping in. If you’ve noticed your fridge smells less than fresh or your ice tastes off, the air filter is usually the culprit. The good news? Replacing a Whirlpool refrigerator air filter is one of the easiest maintenance tasks you can handle yourself, no special tools required, just 10 minutes of your time. This guide walks you through finding the right filter, installing it correctly, and keeping your fridge running at peak freshness. Whether it’s your first time or you’re just looking for a refresh, you’ll have this project done before lunch.
Table of Contents
ToggleKey Takeaways
- A Whirlpool refrigerator air filter traps odors, bacteria, and particles to keep your fridge fresh, and replacing it takes just 10 minutes with no special tools required.
- Most Whirlpool models need air filter replacement every six months, or every three months if you cook pungent foods frequently, to maintain odor control and cooling efficiency.
- Always locate your model number on the white label inside your fridge and search for the exact compatible part number to ensure you buy the correct replacement filter.
- Insert the new filter with the arrow pointing toward the fridge interior, turn clockwise until snug, and reset the filter indicator light by holding the Filter Reset button for three seconds.
- If odors persist after installation, wait 48 hours for the filter to absorb established smells, and verify the filter is properly seated and any spoiled items are removed from your fridge.
- Set a phone reminder or mark your calendar for six months after installation to avoid forgetting when your Whirlpool refrigerator air filter needs replacement.
Understanding Your Whirlpool Refrigerator Air Filter
Your Whirlpool refrigerator’s air filter does one important job: it traps odors, bacteria, and airborne particles that naturally build up inside a sealed space. Think of it like the air filter in your car’s engine, it keeps the bad stuff out so the good stuff runs clean.
Most Whirlpool models use one of two filter types. The charcoal-based filter is the most common: it absorbs odors using activated charcoal and typically needs replacing every six months. Some newer models use an ionizing air filter, which uses ions to neutralize odors rather than physical filtration, though these still need periodic replacement.
The filter sits in one of two spots depending on your model: behind the kickplate at the front bottom of the fridge, or tucked inside the upper corner near the ceiling. You’ll want to know which type and location yours uses before you start shopping for a replacement. Check your model number on the inside wall, it’s usually printed on a white label and starts with “W” followed by numbers.
Why You Need to Replace Your Air Filter Regularly
Skipping air filter replacements is how your fridge turns into a smell machine. A clogged filter loses its ability to absorb odors: instead of trapping smells, it lets them circulate back into your food storage areas. You might notice your ice cubes taste like last week’s leftover fish, or open the door to a mystery funk that makes you question what’s buried in the crisper drawer.
Beyond odor control, a saturated filter also forces your refrigerator’s circulation system to work harder to move air through it. This puts unnecessary strain on the motor and can reduce cooling efficiency, making your unit work longer to maintain temperature. Over time, that’s like paying extra for your energy bill to breathe stale air.
Most manufacturers recommend replacing your air filter every six months for average households: if you cook pungent foods frequently (curries, fish, cabbage), every three months is smarter. That schedule keeps odors in check and maintains your fridge’s efficiency without guesswork.
Finding the Right Replacement Filter for Your Model
Buying the wrong filter is worse than buying no filter, you’ll install it, feel proud, and then wonder why nothing improved. Whirlpool makes dozens of filter styles for different refrigerator lines, so accuracy matters here.
Start with your model number. Locate the white label inside your fridge (usually on the upper wall or back), and write down the full model number. Then visit the Good Housekeeping appliance product reviews or search “Whirlpool [your model number] air filter” to find compatible parts. You can also call Whirlpool’s customer service line, they’ll tell you the exact replacement part number in under two minutes.
When you’re shopping, you’ll see filters listed by part number (like 8171434 or 12392014). Don’t guess between similar-sounding numbers: they fit different models and won’t work interchangeably. Buy directly from Whirlpool, reputable appliance parts retailers, or major online marketplaces where you can verify the compatibility before checkout. Expect to pay $30 to $60 for an authentic Whirlpool filter, though third-party alternatives run $15 to $25. Stick with genuine or certified filters to avoid air leaks around a poorly fitting replacement.
Step-by-Step Replacement Instructions
Locate the Filter
First, identify whether your filter sits in the kickplate (front bottom) or the ceiling area. Open the fridge door and look around the upper corners and ceiling, you’ll see a plastic cover with a twist-lock or latch mechanism if it’s an overhead filter. If not there, lie down and peer behind the base kickplate: you’ll see a cartridge housing at the front-bottom center.
Remove the Old Filter
For overhead filters: Locate the plastic cover and gently twist it counterclockwise (or press the release tab, depending on your model) until it pulls free. The filter cartridge will slide out easily. For bottom-mounted filters: Open the kickplate by releasing the clip or unlatching the hinge, then locate the cylindrical filter cartridge. Turn it counterclockwise about a quarter turn and pull straight out. You may see a little air when you pull it, that’s normal.
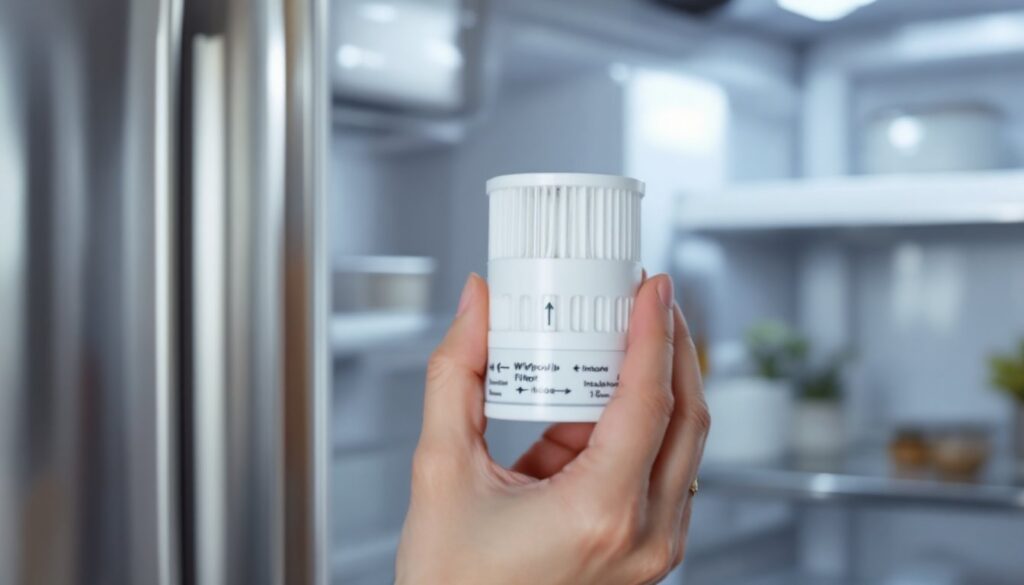
Insert the New Filter
Before installing, inspect the housing for any loose debris or buildup and wipe it clean with a dry cloth. Take your new filter and check the arrow printed on the side, it should point toward the fridge’s interior. Slide the filter into the housing cartridge (overhead) or insert it into the bottom mount and turn clockwise until snug. Don’t force it: a quarter turn past snug is plenty. Replace the cover or kickplate and confirm it locks securely.
Run Your System
After installation, many Whirlpool models have a filter indicator light on the control panel. If yours does, press and hold the Filter Reset button for three seconds. This resets the timer so your fridge knows you’ve just installed a fresh filter. Run the ice maker for the first time to flush any new-filter dust into a sink (discard the first batch of cubes). Your fridge is now ready to work fresh again.
Troubleshooting Common Issues
Filter Won’t Turn or Comes Out Easily: If the filter feels stuck, don’t force it, stop and check that you’re turning in the right direction (counterclockwise to remove). If it still won’t budge, the housing itself may be misaligned. Try wiggling it slightly side-to-side while turning gently. If it comes out too easily, the housing may be worn and you’ll need to contact Whirlpool for a replacement housing. A loose filter defeats the entire purpose and lets odors bypass the system.
Odors Persist After Replacement: Give it 48 hours. A new filter needs time to begin absorbing established odors. Run a full cycle of ice production and discard those cubes. If smells haven’t improved after a week, suspect two things: either the filter wasn’t properly seated (pull it out and reinstall carefully), or there’s a spoiled item somewhere in your fridge that’s the real source. Search your shelves before assuming the filter failed.
Water Drips After Installation: Some overhead filters have a small drain hole. A drop or two during the first day is normal as the filter settles and moisture redistributes. More than that suggests misalignment. Reinstall the filter and ensure the cover latches fully. For bottom-mounted units, confirm the kickplate is secure so condensation doesn’t escape around the edges.
Maintenance Tips to Extend Filter Life
Getting six months from your filter isn’t automatic, how you use your fridge matters. Keep the refrigerator temperature between 35°F and 38°F: colder settings increase air circulation and filter usage, shortening the filter’s life. Store highly aromatic foods (onions, garlic, aged cheeses) in sealed containers rather than open bowls. The less odor your filter has to absorb, the longer it lasts.
Clean the filter housing every other month by gently vacuuming around the exterior. Dust buildup restricts airflow and forces the filter to work harder. For the ice maker, run a water filter replacement on its own schedule, air and water filtration are separate systems, and Today’s Homeowner seasonal maintenance guides recommend checking both.
Mark your calendar when you install a new filter, or set a phone reminder for six months out. Many people forget the date and end up with a stale fridge before realizing it’s time. Some of the newer Whirlpool models have smart features that send alerts to your phone when it’s time, but if yours doesn’t, a physical reminder works just as well. Regular replacement is cheaper and easier than dealing with mystery odors or unexpected repairs.
Conclusion
Replacing your Whirlpool refrigerator air filter is a straightforward maintenance task that takes minutes but pays dividends in freshness and efficiency. You’ve now got the roadmap: find your model number, buy the right filter, install it correctly, and set a replacement reminder for six months from now. That’s it. Your fridge will smell better, your ice will taste cleaner, and you’ll know you’ve kept your appliance running at its best. It’s the kind of simple DIY win that keeps a kitchen running right.